Recently I had to work with team to move their build system to Visual Studio 2005 SP1. Currently their build system was setup with Visual Studio 2005 with various third party software , environment settings, registry changes , which are necessary to build the legacy software. Team wanted to try out Visual Studio 2005 SP1 changes on clean workstation with all necessary settings so that they could build software and run some tests and once they are confident then they can update existing build systems to Visual Studio 2005 SP1.
Unfortunately setting up new system requires lengthy process. It requires going through their build system setup documentation and making sure that all the third party software, environment variables, registry settings and other settings in proper order. This can easily take up 1/2 day of work, even then it is not guaranteed to work , because you could easily miss out some settings.
I knew that using Virtualization technologies we could do physical to virtual desk conversion but I never tried it.
Enter Physical-to-Virtual ( P2V )
Physical to Virtual Conversion (P2V) is the process by which an existing operating system on a physical server — its filesystem, applications and configuration, etc. — is cast into a virtualized instance of the same operating system and filesystem, transferred, instantiated, and started as a VM on hosted or bare metal virtualized platform. All major virtualization software vendor’s provides tool which can create virtual disk format from the physical disk , which is first step in P2V, VMware provides VMware vCenter Converter and Microsoft provides SCVMM (System Center Virtualization Manager) .
But each of these solutions requires installing some software. I wanted simple standalone solution, after searching on the web , found Disk2Vhd tool from sysinternals (now part of Microsoft). This tool is standalone executable, simple to use and does not require to install any software. It creates virtual appliance in VHD (virtual hard disk) format and all major vendors directly supports this format.
Once tool creates VHD file I can attach the virtual appliance into virtual machine monitor ( VMM ) such as VirtualBox , Xen,Hyper-v or VMware workstation and install the new service pack on top of the exiting virtual build machine setup.
Following section describes steps to move physical machine to virtual machine using Disk2VHD and VirtualBox software
1. Download Disk2Vhd tool from Microsoft technet site.
2. Run Disk2Vhd tool on a physical machine , you wish to convert to virtual . This tool list the all available drives on a system and the required disk space for storing virtual disk (VHD).
3. After selecting the required options , select Create
To make it fast , you can select different disk location for storing the VHD file. Also make sure that you un-check all network drives and other drives which you do not wish to include .
4. Once VHD file is created , take the VHD to to different machine where Virtual machine monitor software is installed ( Hyper-V or Vmware Wokstation …etc ) , create new virtual machine and attach the VHD.
5. In this example I will uses VirtualBox VMM ( Virtual machine monitor ) to attach the VHD.
6. Create new VM in VirtualBox ( Machine->New ). In the “Create New Virtual Machine” dialog, enter name and select OS. In this case my build system was in Windows 7 , I selected the same.
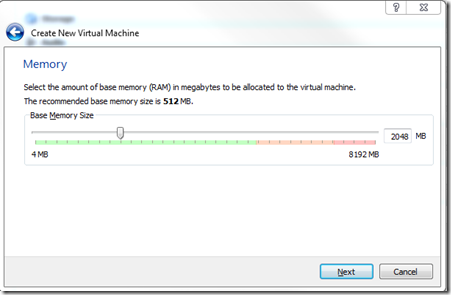
7.Select Next and provide memory for new VM.
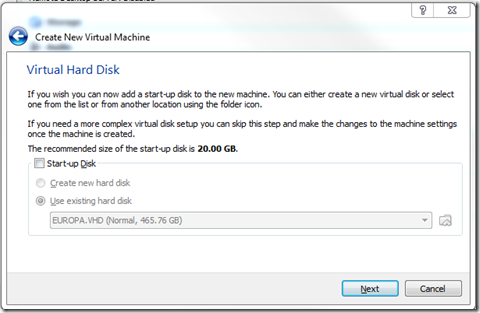
8. Select Next. In this dialog un-check “Start-up Disk” option. This allows us to attach existing VHD to VM instance.
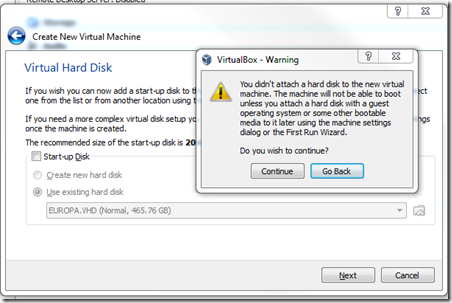
9. Select Next , Following warning message is show, click “Continue”
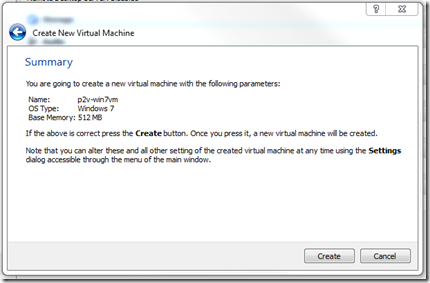
10. Select Next,
11. This will complete the creation of new Virtual machine. But still we have not configured it to use VHD file got from the P2V conversion.
From the VirtualBox Manager select the newly created VM ( p2v-win7vm) from the pane and select “Settings” options , as shown below.
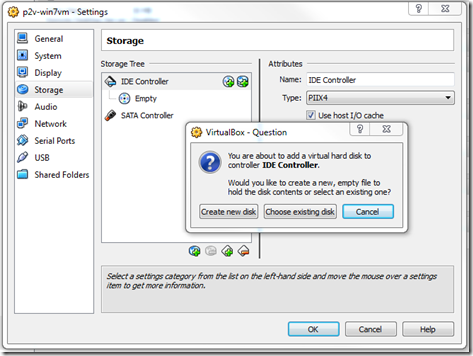
12.In “Settings” dialog select “Storage” option on the left pane and click “+” button on IDE controller to add existing VHD . Once this option is select VirtualBox brings up dialog to choose existing disk.
13. Once VHD is selected, you can modify other settings such as memory, processors and video memory from this dialog.
14. Now Virtual machine creation is complete , you can stat the VM, you have replica of your physical setup inside VM.
In conclusion P2V is great technology to create copy/move your physical server instance inside VM .
Resources
1. TechNet site.


